Installing OpenAPS on your rig
Getting your rig with OpenAPS takes generally six steps:
- Jubilinux installation (called “flashing” the Edison - Pi users can skip to step 2)
- Getting first wifi network connection
- Installing “dependencies” (helper code that make all the OpenAPS code function)
- Installing your OpenAPS loop
- Watching Pump-loop Log
- Finish your setup
- The first step may already be done for you if you purchased a pre-flashed Edison board.
- The second and third steps are accomplished through what is called the “bootstrap” script.
- The fourth step is accomplished through what is called the “setup script”.
- The fifth step is an important, required step. You need to be familiar with how to read and access your logs.
- The sixth step is all the polishing steps to your OpenAPS setup. Things like optimizing your settings, preferences, BT-tethering, IFTTT, etc.
Step 1: Jubilinux (for Edison rigs only)
Pi users can skip to step 2
If you purchased a pre-flashed Edison, you can also skip on down to step 2.
If you need to flash your Edison, the directions are slightly different depending on the computer you are using. Please see the Mac-specific flashing page or the Windows-specific flashing page for detailed info on how to flash jubilinux. There is also a more general flashing page here that has some good troubleshooting tips at the end of the page, if you flashing stalls out.
Steps 2-3: Wifi and Dependencies
Steps 2-3 are covered in the page links below, dependent on which type of rig you are using.
- If you are using an Intel Edison, start with the Intel Edison instructions.
- If you are using a Raspberry Pi, start with the Raspberry Pi instructions.
Going through steps 1-3 may take about 1-3 hours depending on your internet connection, whether the edison was pre-flashed, and comfort level with the instructions. At the end of the bootstrap script (step 3), you will be asked if you want to continue on with the set-up script (step 4). If you need to take a break and come back to step 4 later, you can answer “no” to continuing on and come back later...picking up at the directions below for running the setup script.
Step 4: Setup script
If you pressed
enterto continuing on with the setup script at the end of the bootstrap script, you do NOT need to specifically enter the command in the box below. By pressingenterto continuing on with setup script, the command was automatically started for you.If you pressed
control-cto end at the completion of the bootstrap script and did not continue automatically with setup script, this is where you’ll pick back up. At this point, your rig should have your first wifi connection finished and your dependencies installed.Login to your rig and run the following command (aka “the setup script”):
cd && ~/src/oref0/bin/oref0-setup.sh
(Note: if this is your first time logging into the rig since running bootstrap script, you will have to change your rig’s password on this first login. You will enter the default password first of edison and then be prompted to enter your new password twice in a row. If you get an error, you likely forgot to enter edison at the first prompt for changing the password.)
Be prepared to enter the following information into the setup script:
The screenshot below shows an example of the questions you’ll be prompted to reply to during the setup script (oref0-setup). Your answers will depend on the particulars of your setup. Also, don’t expect the rainbow colored background - that’s just to help you see each of the sections it will ask you about!
Be prepared to enter the following items (click here to expand list):
- 6-digit serial number of your pump
- whether you are using an Explorer board
- if not an Explorer board, and not a Carelink stick, you’ll need to enter the mmeowlink port for TI stick. See here for directions on finding your port
- if you’re using a Carelink, you will NOT be using mmeowlink. After you finish setup you need to check if the line
radio_type = carelinkis present in yourpump.inifile.
- CGM method: The options are
g4-go,g5,g5-upload,g6,g6-upload,mdt,xdrip, andxdrip-js.- The various G4/G5/G6 options are for plugging a physical receiver into the rig with USB.
- If you would like the rig to communicate directly with your G5/G6 transmitter over Bluetooth (most likely in place of a receiver, using Alternate Channel mode), choose xdrip-js.
- Do not choose MDT unless you are using an Enlite sensor attached to the pump you’re looping with. If you use FreeStyle Libre or Medtronic 640G as a CGM, or any other CGM system that gets its data only from Nightscout, you should choose g4-go, g5, or g6. OpenAPS also attempts to get BG data from your Nightscout. OpenAPS will always use the most recent BG data regardless of the source, so if offline looping is unavailable, if will try to pull from NS, and vice versa.
- Nightscout URL and API secret (or NS authentication token, if you use that option)
- BT MAC address of your phone, if you want to pair for BT tethering to personal hotspot (letters should be in all caps)
- Note, you’ll still need to do finish the BT tethering as outlined here after setup.
- Your desired max-iob
- whether you want Autosensitivity and/or Autotune enabled
- whether you want any carbs-required Pushover notifications (and if you do, you’ll need your Pushover API token and User Key)
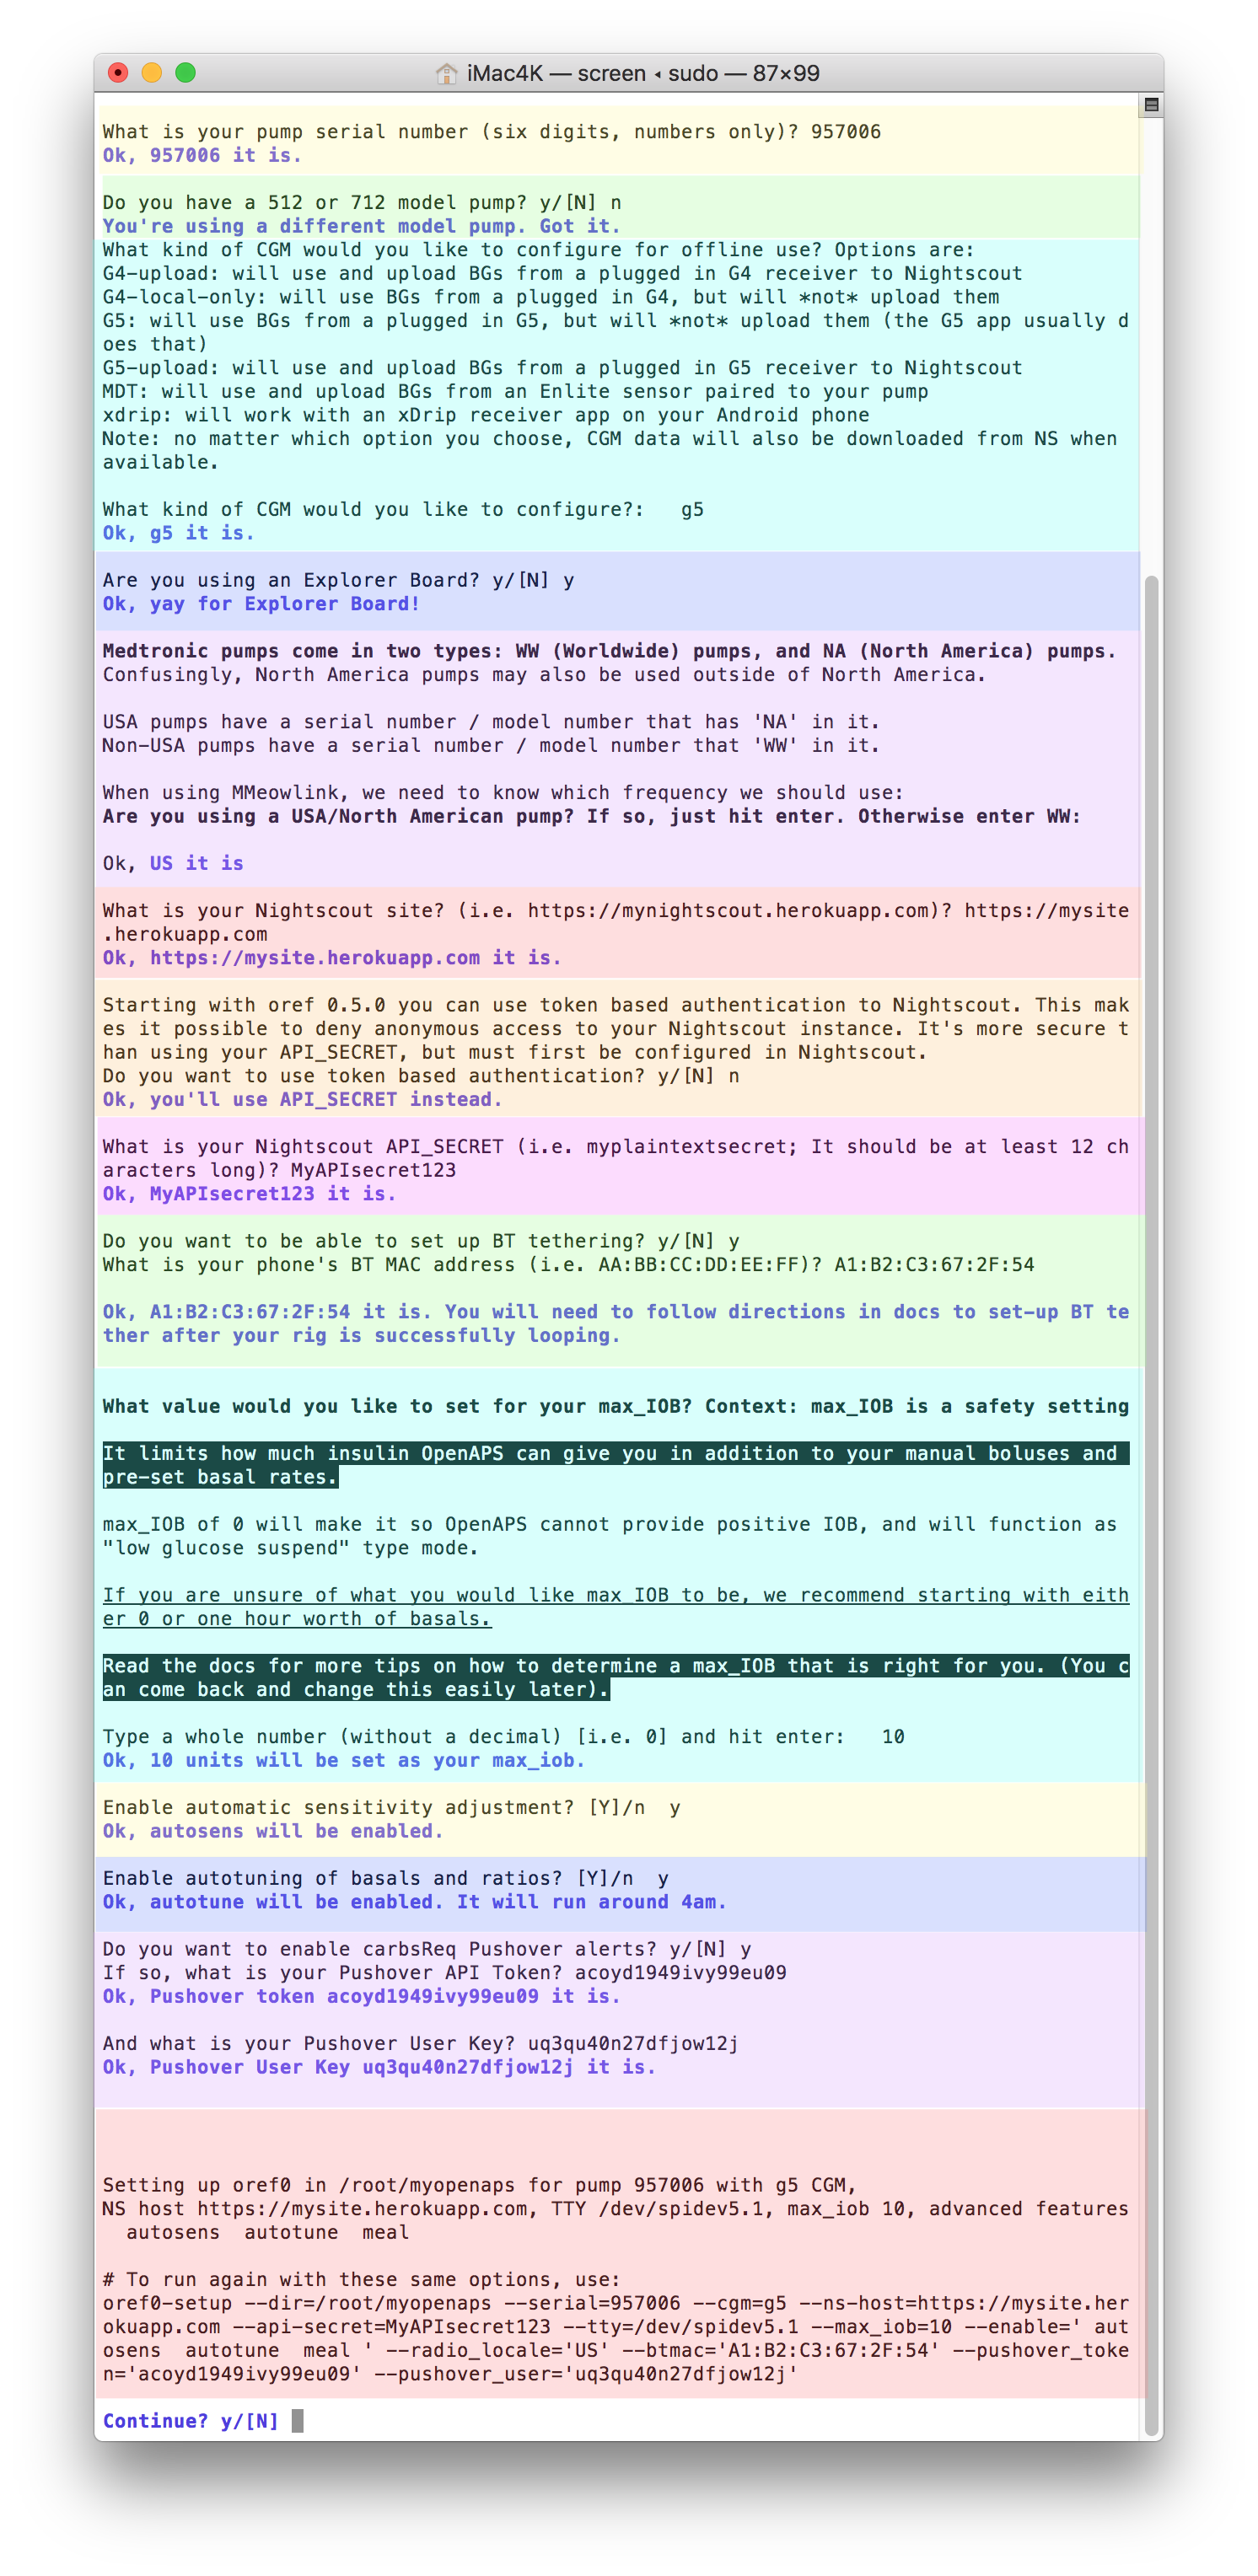
At the end of the questions, the script will ask if you want to continue. Review the information provided in the “to run again with these same options” area...check for any typos. If everything looks correct, then press y to continue. If you see a typo, press n and then type cd && ~/src/oref0/bin/oref0-setup.sh to start the setup questions over again.
After the setup script finishes building your loop (called myopenaps), it will ask if you want to schedule a cron (in other words, automate and turn on your loop) and remove any existing cron. You’ll want to answer y to both - and also then press enter to reboot after the cron is installed. If your setup script stalls out before those two questions happen, rerun the setup script again.
Log rotate fix
Click here to expand notes about checking log rotate, which was fixed in 0.6.1:
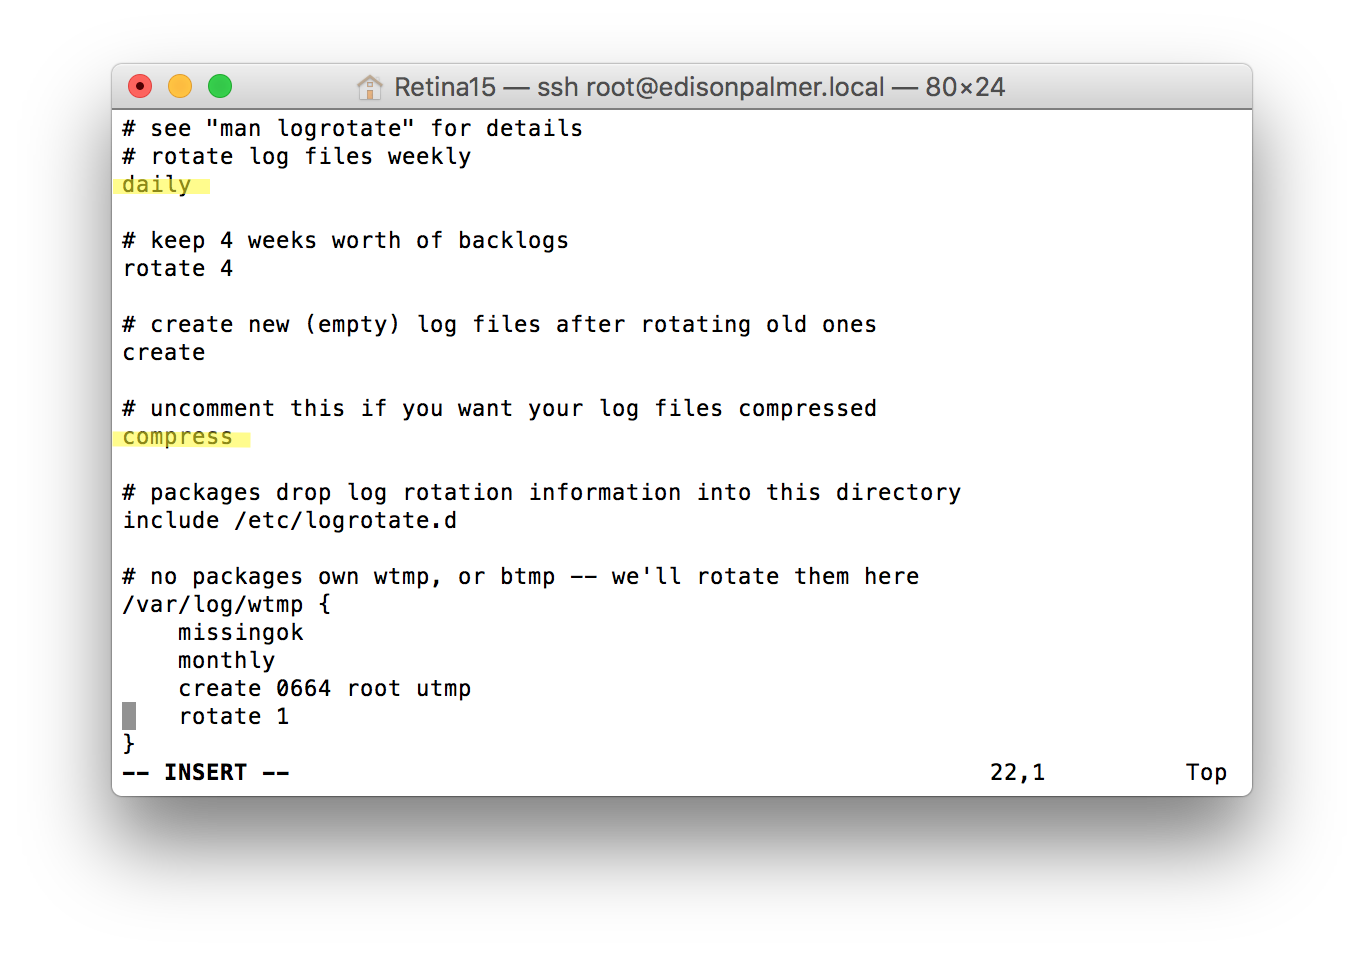
Make sure that at the end of the setup script, your log rotate file is set to daily as described below. Most users will have the compress line properly edited already, but the log rotate file seems to be left at weekly for many users. If you leave the setup at weekly, you will likely get a device full error in your pump logs within a week...so please check this before moving on!
- Enter
vi /etc/logrotate.confthen press “i” for INSERT mode, and make the following changes so that your file matches the one below for the highlighted areas: - set the log rotation to
dailyfromweekly - remove the # from the “#compress” line (if it is present)
- Press ESC and then type
:wqto save and quit
Step 5: Watch your Pump-Loop Log
THIS IS A REQUIRED MUST-LEARN HOW-TO STEP - DO NOT MOVE ON WITHOUT DOING THIS! This is a key skill for monitoring your OpenAPS setup to “check” or “monitor” or “watch” the logs.
It’s easy: simply type the letter l (short for “log”, aka the very important pump-loop.log). (This is a shortcut for the full command, tail -F /var/log/openaps/pump-loop.log.)
What you’ll see while waiting for your first loop (common non-error messages)
If this is your first rig, you are probably (1) going to underestimate how long it takes for the first loop to successfully run and (2) while underestimating the time, you’ll freak out over the messages you see in the pump-loop logs. Let’s go over what are NOT errors:
Click here to expand the explanation of the non-error messages
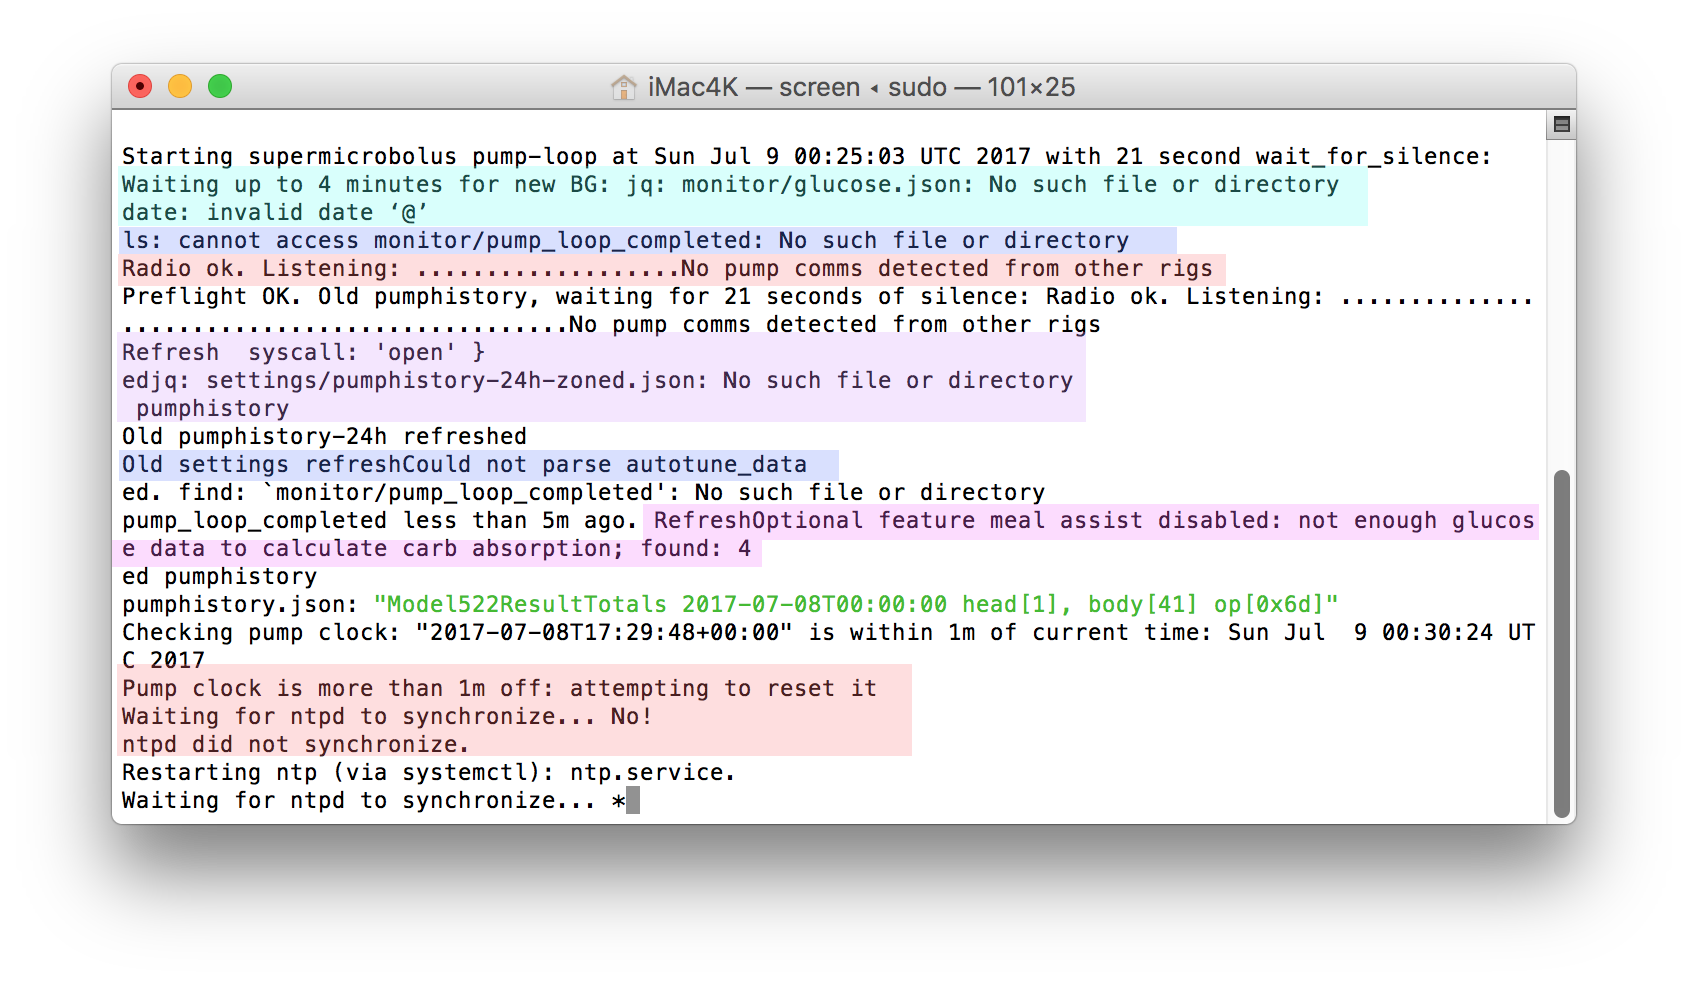
When your loop very first starts, if you are quick enough to get into the logs before the first BG is read, you will likely see:
Waiting up to 4 minutes for new BG: jq: monitor/glucose.json: No such file or directory
date: invalid date '@'
Don’t worry...once you get a BG reading in, that error will go away.
The next not-error you may see:
ls: cannot access monitor/pump_loop_completed: No such file or directory
Don’t worry about that one either. It’s only going to show because there hasn’t been a completely loop yet. Once a loop completes, that file gets created and the “error” message will stop.
Next frequently confused non-error:
Waiting for silence: Radio ok. Listening.....No pump comms detected from other rigs
Well, hey that’s actually a good message. It’s saying “I don’t hear any interruptions from other rigs, so I won’t be needing to wait my turn to talk to the pump.” That message will continue to show even when your loop is successfully running.
As the pump loop continues:
Refreshed jq: settings/pumphistory-24h-zoned.json: No such file or directory
That message will clear out once the pump history has successfully been read.
Or how about the fact that autotune hasn’t run yet, but you enabled it during setup:
Old settings refresh Could not parse autotune_data
Autotune only runs at 4:05am every morning. So if autotune has not yet run, you must wait for that error message to clear out, or run it manually. You can still loop while that message is showing. Additionally, you’ll have to wait until autotune runs before SMBs can be enacted. (SMBs won’t enact unless an Autotune directory exists.)
And then you may have an issue about the time on your pump not matching your rig’s time:
Pump clock is more than 1m off: attempting to reset it
Waiting for ntpd to synchronize....No!
ntpd did not synchronize.
This synchronization may fail a few times before it actually succeeds...be patient. There’s a script called oref0-set-device-clocks that will eventually (assuming you have internet connection) use the internet to sync the rig and pump’s times automatically when they are more than 1 minute different. (If you don’t have internet connection, you may need to do that yourself on the pump manually.)
How about these daunting messages:
Optional feature meal assist disabled: not enough glucose data to calculate carb absorption; found: 4

and

carbsReq: NaN CI Duration: NaN hours and ACI Duration: NaN hours

and

"carbs":0, "reason": "not enough glucose data to calculate carb absorption"
Advanced meal assist requires at least 36 BG readings before it can begin to calculate its necessary data. So after about three hours of looping these messages will clear out. You can watch the count-up of “found” BG readings and know when you are getting close.
What you’ll see when you are looping successfully ~20+ minutes later!
Finally, you should eventually see colorful indications of successful looping, with a message saying “Starting with oref0-pump-loop” and ending with “Completed oref0-pump-loop”

Reading these should give you an idea for what OpenAPS knows: current BG, changes in BG, information about netIOB (taking into account any temp basals it has set along with any boluses you have done), carbs on board, etc. Plus, it will give you information about the predictions and show you the data points it is using to draw the “purple prediction lines” in Nightscout. It also will tell you what, if anything, is limiting it’s ability to give more insulin - i.e. if you have maxIOB at 0, or it is capped by one of the safety settings, etc. This information is a longer version of the information that will show in the “OpenAPS pill” on Nightscout. And - this is where it will tell you what insulin it thinks you need (more/less and how much) and what temporary basal rate (temp basal) it will try to set next to adjust and bring your eventualBG prediction into your target range. (For more details on how to interpret the OpenAPS math and information, see this page for understanding OpenAPS determine-basal.)
If after 20 minutes, you still have some errors showing instead of the above successful looping information, it may be time to head over to the Troubleshooting oref0-setup tips page for ideas on your error messages and how to resolve them. IF you aren’t able to resolve your errors, please make sure that you have captured the error messages before heading over to Gitter or Facebook to get help. Troubleshooting is far more successful when you come prepared with the error messages.
Done watching the logs? Type control-C to exit the pump-loop log.
Temp basals > 6.3, ISF > 255 or carb ratio > 25 with a x23 or x54?
Expand here for notes:
- If your rig tries and fails to set a temp basal > 6.3 you should see “ValueError: byte must be in range(0, 256)” in the log.
- If your pump ISF setting is > 255 the ISF shown in the log and in the OpenAPS pill in Nightscout will be 256 less than the actual pump setting (257 will show as 1).
- If your pump carb ratio is > 25 and you have a x23 or x54 pump you will see a message about “carb ratio out of bounds” in the log.
To fix these problems you need to update decocare. This is easy. Type control-C to exit the pump-loop log. Then copy the following 3 lines to the terminal window.
cd ~/src && git clone git://github.com/openaps/decocare.git
cd decocare
python setup.py install
Rig Logs and Shortcut commands - bookmark this section!
Checking your pump-loop.log is a great place to start anytime you are having looping failures. Your error may not be in the pump-loop, but the majority of the time, you’ll get a good head start on the issue by looking at the logs first. So, develop a good habit of checking the pump-loop log to get to know what a normal log looks like so that when a real error appears, you can easily see it as out of place and needing to be addressed. Additionally, knowing how to access your pump-loop log is important if you come to Gitter or Facebook looking for troubleshooting help...one of the first questions will usually be “what does your pump-loop log look like?” or “what do the logs say?”
Note: The pump-loop log is not the only log your rig generates. There are also several other loop logs contained within your OpenAPS setup such as:
- Autosens log:
tail -F /var/log/openaps/autosens-loop.log - Nightscout log:
tail -F /var/log/openaps/ns-loop.log - Network log:
tail -F /var/log/openaps/network.log - Autotune log:
tail -F /var/log/openaps/autotune.log(remember Autotune only runs at midnight (or at 4AM starting from 0.6.0-rc1), so there’s not much action in that log)
These logs and other files are things you may frequently access. There are shortcuts built in to help you more easily access key files on the go. The l you type for logs is an example of one of these shortcuts - it’s actually a shortcut for the full command tail -F /var/log/openaps/pump-loop.log. Here are other shortcuts:
 --View live logs--
 l => tail -F /var/log/openaps/pump-loop.log
 autosens-looplog => tail -n 100 -F /var/log/openaps/autosens-loop.log
 autotunelog => tail -n 100 -F /var/log/openaps/autotune.log
 ns-looplog => tail -n 100 -F /var/log/openaps/ns-loop.log
 pump-looplog => tail -n 100 -F /var/log/openaps/pump-loop.log
 networklog => tail -n 100 -F /var/log/openaps/network.log
 xdrip-looplog => tail -n 100 -F /var/log/openaps/xdrip-loop.log
 cgm-looplog => tail -n 100 -F /var/log/openaps/cgm-loop.log
 urchin-looplog => tail -n 100 -F /var/log/openaps/urchin-loop.log
 * to quit watching, press Ctrl+C

 --View settings/logs/info--
 cat-pref => cd ~/myopenaps && cat preferences.json
 cat-wifi => cat /etc/wpa_supplicant/wpa_supplicant.conf
 cat-autotune => cd ~/myopenaps/autotune && cat autotune_recommendations.log
 cat-runagain => cd ~/myopenaps && cat oref0-runagain.sh
 git-branch => cd ~/src/oref0 && git branch
 edison-battery => cd ~/myopenaps/monitor && cat edison-battery.json
 cat-reservoir => cd ~/myopenaps/monitor && cat reservoir.json

 --Edit settings--
 edit-wifi => vi /etc/wpa_supplicant/wpa_supplicant.conf
 edit-pref => cd ~/myopenaps && vi preferences.json
 edit-runagain => cd ~/myopenaps && nano oref0-runagain.sh
To use these shortcuts, just type in the phrase you see on the left - i.e. edit-wifi and hit enter.
Step 6: Finish your OpenAPS setup
You’re looping? Congrats! However, you’re not done quite done yet.
Shortly after you confirm your loop is running, you should set your preferences. Don’t forget, your preferences are reset to defaults after each run of a setup script, so please remember to check preferences after confirming a loop is successfully run/rerun.
As your time permits, there’s still more useful and cool things you can do to make looping more efficient and automated.
- Add more wifi networks to your rig so that when you are away from home, the rig has access to trusted wifi networks
- Setup Papertrail Papertrail will even allow you to remotely track your logs when you are not logged into your rig. Setting up Papertrail and watching your logs will dramatically help you understand your rig and help troubleshoot if you run into problems.
- Setup IFTTT for your phone or watch to allow you to use Nightscout’s temp targets, carb entries, and similar for single button interactions with your rig
- Finish Bluetooth tethering your phone so that when you are away from trusted wifi networks, your rig can automatically access your phone’s mobile hotspot for continued online looping.
- Learn about offline looping for times when your rig is not able to access internet (no wifi, no hotspot).
- Additional access to your rig via other types of mobile apps. Grab some of these other apps, based on your preference, for accessing your rig in different ways.
Remember, the performance of your DIY closed loop is up to you. Make sure you at least look at the rest of the documentation for help with troubleshooting, ideas about advanced features you can implement in the future when you’re comfortable with baseline looping, and more. Plus, the docs are updated frequently, so it’s worth bookmarking and checking back periodically to see what features and preference options have been added.