Setting Up Your Raspberry Pi
WARNING - THIS DOCUMENT IS DEPRECATED (NOT RECOMMENDED) AND UNMAINTAINED. We suggest you look to the top of the docs for information on the currently recommended hardware setup instead. As of November 2017 there are new and simplified Raspberry Pi setup instructions linked from there. The instructions below should only be used for troubleshooting purposes if the new instructions aren’t working.
Note: There are two setup flows described on this page. The one toward the bottom of the page is the older setup instructions that worked back in the day. The one at the top of the page (all prefaced with “newer path”) is an attempt by someone to make the Pi instructions work for Pi3 and Pi0W. There may be issues with BOTH setups, so please do make PRs to this page and/or discuss on Gitter about which setup flow works.
Newer Path
This is for Pi3 and the Pi zero W using the TI CC1111 radio stick
Newer Path: Setting Up Your Raspberry Pi using Windows
Newer Path: Setup your TI cc1111 radio stick
Follow this link to grab the correct firmware https://github.com/oskarpearson/mmeowlink/wiki/TI-USB-stick
For the Pi with the TI choose:usb_ep0_TI_DONGLE_US_STDLOC.hex
Save the .hex file for use in the next step.
Download the flash programmer tool from Texas Instruments using this link
http://www.ti.com/tool/flash-programmer

Note: choose the Flash Programmer tool not the Flash Programmer-2
Use this link for installation instructions using Windows.https://github.com/oskarpearson/mmeowlink/wiki/Instructions-for-Flashing-TI-stick-or-SRF-ERF-using-Windows-utilities
    Note: When flashing use the hex file you saved earlier as your firmware. Not the one provided or suggested by Texas
Instruments in their instruction sheet.
Newer Path: Install Raspian (Jessie) on your Pi
Using Pixal:
Make sure Pi is powered down and unplugged.
Insert SD card into SD card slot
Using an HDMI cable attach monitor to Pi using the HDMI port on the Pi
Plug a spare USB keyboard into the PI using the USB slots on the Pi
NOTE With Pi Zero W use USB hub)
Plug the TI radio stick into the top center USB slot of Pi 3
Note if using a Pi Zero W wait until ready to install openaps to plug into Pi
Plug the micro power cable into the Pi
Plug the other end into outlet
The Pi should start up with this screen.

Put an x in the box

Set correct keyboard and country.
Select Install at the top left

You will get a warning that all data will be erased. If this is a new card do not worry

    NOTE Depending on your internet speed this can take 10 – 30 minutes
Once you have the Pixal screen do the following

1. In the top left corner choose MENU/Raspberry Pi Configuration
2. Choose system tab
    A. Change Hostname and password (default password is raspberry)to what you want.
        NOTE: It needs to be at least 8 characters for SSH to work
3. Choose interface tab
    A. Select SSH
4. Do not make any changes under Performance Tab
5. Select Localisation Tab (yes that is the correct spelling on a Pi)
    A. Select each sub tab and fill in the proper settings
    B. If you are in the U.S. choose U.S. and International for the keyboard.
6. Select OK and when asked to reboot select ok
7. In the top menu bar on the right side select your wifi from the dropdown list
Newer Path: Update the repository and upgrade the installed packages:
1. From the bar at the top of the screen choose the terminal icon

    NOTE: we will work in root.

2. To enter root copy and paste the following then press enter

    sudo -i

3. Copy and paste the following then press enter

    NOTE: This will unpackage nodejs and try to remove the legacy version. IF the legacy version does not exist ignore the error messages pertaining to that..

    dpkg -P nodejs nodejs-dev

4. Copy and paste each line of code 1 at a time and press enter after each. These are done as 3 separate commands do to the size of pi zero w processor

    apt-get update

    apt-get dist-upgrade  (get some coffee, take a nap, take a vacation)

    apt-get autoremove

5. Copy and paste code then press enter.

    apt-get install -y sudo strace tcpdump screen acpid vim python-pip locate

6. Copy and paste code then press enter.
    dpkg-reconfigure tzdata

    NOTE: it will default to America. Arrow down and select USA if you are in the US. Then arrow to the right and highlight ok. Then choose time zone and arrow to OK.

7. Copy and paste code then press enter.

    nano /etc/logrotate.conf

    NOTE: I HAVE NOTICED LINUX CAN BE VERY FUSSY AT TIMES. if IT GIVES AND ERROR copy and paste each line 1 at a time and press enter after each.

    cd /etc/

    nano logrotate.conf

    A. Arrow down and change the log rotation to daily from weekly

    B. Enable log compression by removing the hash on the #compress line, to reduce the probability of running out of disk space
    C. Exit and save
Newer Path: Update Firmware
1. Select this line of code and paste into terminal window to update pi firmware and press enter.

    rpi-update

2. Reboot to apply the changes:

    reboot

3. You may have the following message the next time you start pixal

    Press ‘OK’


4. At the top left of screen select menu/ Preferences/Raspberry Pi Configuration and check all settings. Fix if needed.
Newer Path: Find I.P. address

    From terminal window type
    sudo ifconfig
        Write down ip address. You will need this to SSH into Pi.
        NOTE: From this point forward we will use SSH to comunicate with Pi.
Using Putty (if using Windows)or a similar emulator SSH into the Pi using the ip address from above. Use the password you set during setup
Newer Path: Disable Network Power Managemen
The latest few updates of software have Power Save On as a default. This will shut down your wlan0 port even if you add a script to test and restart every 5 minutes. To disable do the following:
1. Copy and paste the following line and press enter

    sudo -i

2. Copy and paste into ssh terminal:

    nano /etc/network/interfaces

3. Arrow down to the end of:  iface wlan0 inet manual

    A. Press enter to create a blank line

    B. Copy and paste the following line into that new space: :

        wireless-power off
NOTE IT IS CRITICAL it goes just below ‘iface wlan0 inet manual’ If you put it above this line your Pi Wifi will not work!

    4. Exit and save nano screen

5. Reboot pi

    reboot
Once system restarts do the following to verify it worked
1. SSH into pi

2. Copy and paste

    iwconfig


3. You should now see Power Management:off
Newer Path: Setup network wpa_supplicant
1. Copy and paste the following then press enter

    sudo -i

2. Copy and paste the following

    nano /etc/wpa_supplicant/wpa_supplicant.conf

3. Match the following. You can copy and paste what you need and simply edit


ctrl_interface=DIR=/var/run/wpa_supplicant GROUP=netdev

update_config=1

country=US
network={
ssid="WifiName"

psk="WifiPassword"

key_mgmt=WPA-PSK

priority=1

id_str="wifi"
}
network={
ssid="HotspotName"

psk="HotspotPassword"

key_mgmt=WPA-PSK

priority=2

id_str="hotspot"
}
Note: I set up a wifi and a wifi hotspot (phone)
Note: Where I use “ “ they are to be included
Exit and save
Newer Path Setup Network Interface
1. Copy and paste the following

    nano /etc/network/interfaces
Newer Path: Match the following.
#interfaces(5) file used by ifup(8) and ifdown(8)

#Please note that this file is written to be used with dhcpcd

#For static IP, consult /etc/dhcpcd.conf and 'man dhcpcd.conf'

#Include files from /etc/network/interfaces.d:

source-directory /etc/network/interfaces.d

auto lo
iface lo inet loopback

iface eth0 inet manual

allow-hotplug wlan0

iface wlan0 inet manual

   wireless-power off

   wpa-conf /etc/wpa_supplicant/wpa_supplicant.conf

allow-hotplug wlan1

iface wlan1 inet manual

   wpa-conf /etc/wpa_supplicant/wpa_supplicant.conf

iface wifi inet dhcp

iface hotspot inet dhcp
Then, Exit and save
Note: Where I called to the wifi and a hotspot (phone) at the bottom
Note: I do not use “ “
Note: inet is left manual
Note: change every line in your original where you see it different here. This is important.
Copy and paste the following
reboot
Press enter
Newer Path: Configure USB tethering on newer androids [optional]
You may have noticed that your rig may not usb tether with your newer android phone such as the Galaxy S7. That is because it appears there is a change to the NDIS driver interface. This should correct your issue:
1. ssh into rig

    sudo -i

2. Copy and paste

    nano /etc/network/interfaces

3. Press enter

4. Copy all lines at once and paste

    allow-hotplug eth1

    iface eth1 inet dhcp

    pre-up ifconfig eth1 hw ether 02:aa:bb:cc:12:02

        NOTE: replace 02:aa:bb:cc:12:02 with your phones wifi mac address)

    reboot

5. For the first time reboot phone

6. Plug in cable to phone and rig

7. Start usb tether on phone
Newer Path: Wifi and Hotspot auto restart
1. Log in as pi using ssh

2. Copy and paste the following then press enter

    sudo -i

3. Copy and paste the following then press enter

    cd /usr/local/bin

        NOTE: if it fails type each line one at a time pressing enter after each

        cd /usr/

        cd local

        cd bin

4. Copy and paste the following then press enter
    nano wifi_reboot.sh
This will create the file
1. Copy and paste the following into the file (copy and paste all at once)
    #!/bin/bash

    #The IP for the server you wish to ping (8.8.8.8 is a public Google DNS server)

    #SERVER=8.8.8.8

    #Only send two pings, sending output to /dev/null

        sudo ping -c2 8.8.8.8 > /dev/null

    #If the return code from ping ($?) is not 0 (meaning there was an error)

        if [ $? != 0 ]

            then

    #Restart the wireless interface

        /sbin/ifdown 'wlan0'

            sleep 3

        /sbin/ifup --force 'wlan0'

fi
Make sure to exit and save
2. Copy and paste followed by enter

    chmod +x /usr/local/bin/wifi_reboot.sh

3. Copy and paste the following then press enter to make it auto run the script from chron:

    nano /etc/crontab

        NOTE: if it fails copy and paste each line 1 at a time followed by enter

    cd /etc/

    nano crontab

4. After the last line copy and paste this (this will check every 3 minutes)

    */3 *   * * *   root    /usr/local/bin/wifi_reboot.sh

5. Exit and save

    reboot
Newer Path: Turn off GUI interface
1. Copy and paste the following

    sudo raspi-config

2. Select boot options

    A. Select B2 console Auto Login Text Console

    B. Select OK

3. Finish

4. Yes reboot
Newer Path - install openaps dependencies and install oref0
Follow the main docs for installing openaps, oref0, and getting your loop running.
http://openaps.readthedocs.io/en/2017-07-13/docs/walkthrough/phase-2/oref0-setup.html
Newer Path - Optional Installs
Enable watchdog
sudo -i

1. SSH into pi

2. Copy and paste the following

    apt-get install watchdog

3. Copy and paste the following

    modprobe bcm2708_wdog

    NOTE: If this command does not work, it appears to be ok to skip it. Newest version gives FATAL error simply because it is not there

4. Copy and paste the following

    bash -c 'echo " bcm2835_wdt " >> /etc/modules'

5. Edit the config file by opening up nano text editor

    nano /etc/watchdog.conf

    NOTE: If it fails do the following

        cd /etc/

        nano watchdog.conf

6. Find the following lines and Uncomment: (remove the # from the following lines, scroll down as needed to find them):

        max-load-1               = 24

        watchdog-device          = /dev/watchdog

    Save and exit

7. Finally, start watchdog by copying and pasting the following:

        service watchdog start


8. To auto start watchdog with each boot copy/paste then enter the following

    cd /boot/

    nano config.txt

9.Add the following line

    dtparam=watchdog=on

10 Exit and Save
newer Path - Make sure GPIO library is installed
1. Log in as pi using ssh

2. Copy ande paste these 3 lines 1 at a time and press enter after each

    sudo apt-get update

    sudo apt-get -y install python-rpi.gpio

    sudo apt-get -y install python3-rpi.gpio

3. Copy and paste

    sudo -i

4. Copy and paste the following

    cd /usr/local/bin

5. Copy and paste the following

    nano fan_speed.py
This will create the file
6. Copy and paste the following into the file (copy and paste all at once)

#!/usr/bin/python

import RPi.GPIO as GPIO

import time

import os

#Return CPU temperature as float

def getCPUtemp():

    cTemp = os.popen('vcgencmd measure_temp').readline()

    return float(cTemp.replace("temp=","").replace("'C\n",""))

#For GPIO numbering, Choose BCMGPIO.setmode(GPIO.BCM)

    GPIO.setmode(GPIO.BCM)

    GPIO.setup(2,GPIO.OUT)

    GPIO.setwarnings(False)

    p=GPIO.PWM(2,100)

while True:

    CPU_temp = getCPUtemp()

    if CPU_temp > 70.0:
        p.start(100)
    elif CPU_temp > 60.0:
        p.start(60)
    elif CPU_temp > 50.0:
        p.start(40)
    elif CPU_temp > 45.0:
        p.start(30)
    elif CPU_temp > 40.0:
        p.start(20)
    elif CPU_temp > 35.0:
        p.start(15)
    elif CPU_temp > 30.0:
        p.start(10)
else:
        p.stop()
time.sleep(180)

GPIO.cleanup()
( exit and save)
7. Copy and paste

    exit
You are now back as pi
8. Copy and paste the following to make it auto run the script from chron:

    sudo crontab -e

9. After the last line copy and paste each of the lines below one at a time (this will check every 3 minutes)


    @reboot /usr/bin/python

    @reboot /usr/local/bin/fan_speed.py

10. Exit and save

    sudo reboot
Newer Path - Configure Bluetooth Low Energy tethering [optional]
Only works if your phone and provider allow Bluetooth tether The Raspberry Pi can be tethered to a smartphone and share the phone’s internet connection. Bluetooth tethering needs to be enabled and configured on the phone device and your carrier/plan must allow tethering. The Raspberry Pi 3 has an inbuilt Bluetooth Low Energy (BLE) chip, while a BLE USB dongle can be used with the other Pi models.
The main advantages of using BLE tethering are that it consumes less power on the phone device than running a portable WiFi hotspot and it allows the Raspberry Pi to use whatever data connection is available on the phone at any given time - e.g. 3G/4G or WiFi. Some have also found that power consumption on the Raspberry Pi is lower when using BLE tethering compared to using a WiFi connection, although this may vary depending on BLE USB dongle, WiFi dongle, etc.
1. First, we clone a repository which contains scripts which are used later in the setup -

    cd /home/pi

    git clone https://github.com/WayneKeenan/RaspberryPi_BTPAN_AutoConnect.git

2. We then copy the required scripts into a ‘bin’ directory -

    mkdir -p /home/pi/bin

    cp /home/pi/RaspberryPi_BTPAN_AutoConnect/bt-pan /home/pi/bin

    cp /home/pi/RaspberryPi_BTPAN_AutoConnect/check-and-connect-bt-pan.sh /home/pi/bin

3. To configure a connection from the command line -

    bluetoothctl

4. Enter the following commands to bring up the adapter and make it discoverable -

    power on

    discoverable on

    agent on

    default-agent
The adapter is now discoverable for three minutes. Search for bluetooth devices on your phone and initiate pairing. The process varies depending on the phone and the dongle in use. The phone may provide a random PIN and bluetoothctl may ask you to confirm it. Enter ‘yes’. Then click ‘pair’ on the phone. Instead, the phone may ask you to enter a PIN. If so, enter ‘0000’ and when bluetoothctl asks for a PIN, enter the same code again. Either way, bluetoothctl should inform you that pairing was successful. It will then ask you to authorize the connection - enter ‘yes’.
5. Execute the paired-devices command to list the paired devices -

    paired-devices
Device AA:BB:CC:DD:EE:FF Nexus 6P
Your paired phone should be listed (in this example, a Google Nexus 6P). Copy the bluetooth address listed for it; we will need to provide this later. Now trust the mobile device (notice that bluetoothctl features auto-complete, so you can type the first few characters of the device’s bluetooth address (which we copied previously) and hit to complete the address. NOTE: Whenever you see ‘AA:BB:CC:DD:EE:FF’ or ‘AA_BB_CC_DD_EE_FF’ in this guide, replace it with the actual address of your mobile Bluetooth device, in the proper format (colons or underscores).
    trust AA:BB:CC:DD:EE:FF

6. Quit bluetoothctl with

    quit

7. Now, we create a service so that a connection is established at startup. Execute the following commands to create a net-bnep-client.service file and open it for editing in Nano -

    cd /etc/systemd/system

    nano net-bnep-client.service

8. In the editor, populate the file with the text below, replacing AA:BB:CC:DD:EE:FF with the address noted earlier -

    [Unit]

    After=bluetooth.service

    PartOf=bluetooth.service

    [Service]

    ExecStart=/home/pi/bin/bt-pan client AA:BB:CC:DD:EE:FF

    [Install]

    WantedBy=bluetooth.target

8. Exit and save

9.Enable the service -

    systemctl enable net-bnep-client.service

10. Open your crontab for editing -

    crontab -e

11. Add an entry to check the connection every minute and reconnect if necessary -

    * * * * * /home/pi/bin/check-and-connect-bt-pan.sh

12. Exit and save

    shutdown -r now
or systemctl reboot
Newer Path - App to check core temp (optional)
1. ssh into pi

    sudo -i

3. copy and paste

    nano my-pi-temp.sh

4. copy and paste all at once

    #!/bin/bash

    #Script: my-pi-temp.sh

    #Purpose: Display the ARM CPU and GPU  temperature of Raspberry Pi 2/3

    #Author: Vivek Gite <www.cyberciti.biz> under GPL v2.x+

    # -------------------------------------------------------

    cpu=$(</sys/class/thermal/thermal_zone0/temp)

    echo "$(date) @ $(hostname)"

    echo "-------------------------------------------"

    echo "GPU => $(/opt/vc/bin/vcgencmd measure_temp)"

    echo "CPU => $((cpu/1000))'C"

5. Copy and paste

    chmod +x my-pi-temp.sh

6. Run it as follows:

    ./my-pi-temp.sh
Older instructions for original Pi-based setups
Note 1: This page talks about setting up the Raspberry Pi with a Carelink USB stick. If you chose the TI stick for your first setup, you’ll need to utilize directions in the mmeowlink wiki for flashing your TI stick, then return here to continue on with the OpenAPS setup process.
Note 2: Setting up a Raspberry Pi is not specific to OpenAPS. Therefore, it’s very easy to Google and find other setup guides and tutorials to help with this process. This is also a good way to get comfortable with using Google if you’re unfamiliar with some of the command line tools. Trust us - even if you’re an experienced programmer, you’ll be doing this throughout the setup process.
Note 3: Since bluetooth was included on the Raspberry Pi 3, changes were made to the UART configuration that require additional steps. Detailed RPi3-specific OpenAPS setup instructions can be found here.
In order to use the RPi2 with openaps development tools, the RPi2 must have an operating system installed and be set up in a very specific way. There are two paths to the initial operating system installation and WiFI setup. Path 1 is recommended for beginners that are very new to using command prompts or “terminal” on the Mac. Path 2 is considered the most convenient approach for those with more experience with coding and allows the RPi2 to be set up without the use of cables, which is also known as a headless install. Either path will work and the path you choose is a matter of personal preference. Either way, it is recommended that you purchase your RPi2 as a CanaKit, which includes everything you will need for a GUI install.
For the Path 1 GUI install you will need:
- A Raspberry Pi 2 CanaKit or similar, which includes several essential accessories in one package
- USB Keyboard
- USB Mouse
- A TV or other screen with HDMI input
For the Path 2 Headless install, you will need:
- Raspberry Pi 2
- 8 GB micro SD Card [and optional adapter so that you can plug in the micro SD Card into your computer]
- Low Profile USB WiFi Adapter
- 2.1 Amp USB Power Supply
- Micro USB cable
- Raspberry Pi 2 CanaKit
- Console cable, Ethernet cable, or Windows/Linux PC that can write ext4 filesystems
Download and Install Raspbian Jessie
Note: If you ordered the recommended CanaKit, your SD card will already come imaged. However, if you don’t already know whether it’s Raspbian 8 Jessie or newer (see below), just treat it as a blank SD card and download and install the latest version of Raspbian (currently version 8.0, codename Jessie).
Download Raspbian
Raspbian is the recommended operating system for OpenAPS.
If you don’t plan on running a graphical user interface on your Raspberry Pi, you can download the ‘lite’ version of Raspbian here; the image is much smaller and will download and write to your SD card more quickly.
If you require a full graphical user interface on your Raspberry Pi, download the latest version of Raspbian here.
Make sure to extract the disk .img from the ZIP file. If you downloaded the full GUI version above, note that the large size of the Raspbian Jessie image means its .zip file uses a different format internally, and the built-in unzipping tools in some versions of Windows and MacOS cannot handle it. The file can be successfully unzipped with 7-Zip on Windows and The Unarchiver on Mac (both are free). You can also unzip it from the command line on a Mac, by opening the Terminal application, navigating to the directory where you download the ZIP file, and typing unzip <filename.zip>.
Write Raspbian to the Micro SD Card
Write the Raspbian .img you extracted from the ZIP file above to the SD card using the Installing OS Images instructions
If necessary, you can erase (format) your SD card using https://www.sdcard.org/downloads/formatter_4/
Detailed Windows Instructions
- First, format your card to take advantage of the full size it offers
- If you got your through CanaKit, when you put it in your PC it will look like it is 1GB in size despite saying it is 8GB
- Download and install: https://www.sdcard.org/downloads/formatter_4/
- Run SDFormatter
- Make sure your Micro SD Card is out of your Raspberry PI (shut it down first) and attached to your computer
- Choose the drive where your card is and hit “Options”
- Format Type: Change to Full (Erase)
- This will erase your old Raspbian OS and make sure you are using the full SD card’s available memory
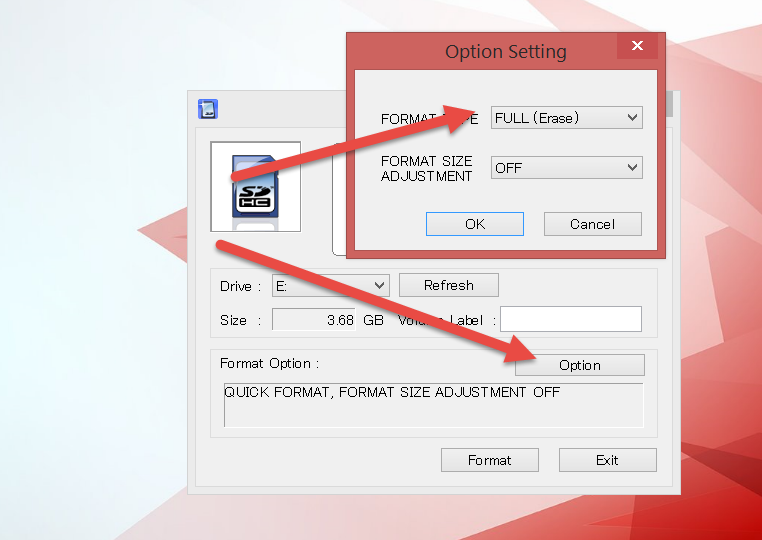
- Format the card
- Download Raspbian 8 / Jessie
- https://www.raspberrypi.org/downloads/raspbian/
- Extract the IMG file
- Follow the instruction here to write the IMG to your SD card
- https://www.raspberrypi.org/documentation/installation/installing-images/README.md
- After writing to the SD card, safely remove it from your computer and put it back into your RPi2 and power it up
Connect and configure WiFi
- Insert the included USB WiFi into the RPi2.
- Next, insert the Micro SD Card into the RPi2.
Path 1: Keyboard, Mouse, and HDMI monitor/TV
- First, insert your USB keyboard and USB mouse into the RPi2.
- Next, connect your RPi2 to a monitor or T.V. using the included HDMI cable.
- Finally connect your RPi2 using the power adapter.
- You should see the GUI appear on screen.
- As of 12/11/2016 the Raspberry Pi Foundation is disabling SSH by default in Raspbian as a security precaution. To enable SSH from within the GUI, open up the terminal window and type
sudo raspi-config. On the configuration menu that opens, scroll down and chooseInterfacing Optionsand then navigate tossh, pressEnterand selectEnablessh server. - Configure WiFi per the instruction pamphlet included with your CanaKit. For those not using the CanaKit, click the computer monitors next to the volume control in the upper-right side and there will be a drop-down menu of available WiFi networks. You should see your home network. If you have trouble connecting to the RPi2 via WiFi, check your router settings. The router may need to be switched from WEP to WPA2.
- Once you have installed Raspbian, connected to WiFI, and enabled SSH you can disconnect the mouse, keyboard and HDMI cable.
Remember to keep your RPi2 plugged in, just disconnect the peripherals. Also remember to never disconnect your RPi2 without shutting it down properly using the sudo shutdown -h now command. If you are unable to access the Pi and must power it off without a shutdown, wait until the green light has stopped flashing (indicating the Pi is no longer writing to the SD card).
You can now skip to Test SSH Access and SSH into your RPi2.
Path 2: Console or Ethernet cable
- Get and connect a console cable (use this guide),
- Temporarily connect RPi to a router with an Ethernet cable and SSH in (see below), or
- Connect the RPi directly to your computer with an Ethernet cable (using this guide) and SSH in (see below)
- As of 12/11/2016 the Raspberry Pi Foundation is disabling SSH by default in Raspbian as a security precaution. To enable SSH, create a file called ssh and save it to the boot directory of the mounted drive. The file can be blank, and it has no extensions. This will tell your Pi to enable SSH.
Configure WiFi Settings
Once you connect to the Pi, you’ll want to set up your wifi network(s). It is recommended to add both your home wifi network and your phone’s hotspot network if you want to use OpenAPS on the go.
To configure wifi:
Type sudo bash and hit enter
Input wpa_passphrase "<my_SSID_hotspot>" "<my_hotspot_password>" >> /etc/wpa_supplicant/wpa_supplicant.conf and hit enter (where <my_SSID_hotspot> is the name of your phone’s hotspot and <my_hotspot_password> is the password).
(It should look like: wpa_passphrase "OpenAPS hotspot" "123loveOpenAPS4ever" >> /etc/wpa_supplicant/wpa_supplicant.conf)
Input your home wifi next: wpa_passphrase "<my_SSID_home>" "<my_home_network_password>" >> /etc/wpa_supplicant/wpa_supplicant.conf (and hit enter)
You will also want to edit /etc/network/interfaces to change the following line from iface wlan0 inet manual to iface wlan0 inet dhcp
To accomplish this input sudo nano /etc/network/interfaces and change manual to dhcp on the line that has iface wlan0 inet
The dhcp tells the ifup process to configure the interface to expect some type of dhcp server on the other end, and use that to configure the IP/Netmask, Gateway, and DNS addresses on your Pi. The manual indicates to the ifup process that that interface is not to be configured at all. For further reading on the interfaces and wpa_supplicant.conf files, type man 5 interfaces or man 5 wpa_supplicant when logged into your Pi.
If you are not familiar with nano (the text editor) you may want to check out this tutorial
You can now skip to Test SSH Access and SSH into your RPi2.
Path 3: Headless WiFi configuration (Windows/Linux only)
Keep the SD card in the reader in your computer. In this step, the WiFi interface is going to be configured in Raspbian, so that we can SSH in to the RPi2 and access the device remotely, such as on a computer or a mobile device via an SSH client, via the WiFi connection that we configure. Go to the directory where your SD card is with all of the files for running Raspbian on your RPi2, and open this file in a text editor.
/path/to/sd/card/etc/wpa_supplicant/wpa_supplicant.conf
In this file you will list your known WiFi networks so your Pi can connect automatically when roaming (e.g., between your home WiFi and your mobile hotspot).
ctrl_interface=DIR=/var/run/wpa_supplicant GROUP=netdev
update_config=1
network={
        ssid="YOURMOBILESSID"
        psk="YOURMOBILEPASS"
}
network={
        ssid="YOURHOMESSID"
        psk="YOURHOMEPASS"
}
You can add as many network as you need, the next reboot your system will connect to the first available network listed in your config files. Once the network to which your board is connected becomes unavailable, it start looking for any other known network in the area, and it connects to it if available.
If you want to connect to a router which doesn’t broadcast an SSID, add a line with scan_ssid=1 after the ssid and psk lines for that network. (More info and examples for the options you can specify for each network are here.)
Boot your Pi. (Put the SD card into the RPi2. Plug in the compatible USB WiFi adapter into a RPi2 USB port. Get a micro USB cable and plug the micro USB end into the side of the RPi2 and plug the USB side into the USB power supply.)
If you are unable to access this file on your computer:
- Connect your Pi to your computer with an Ethernet cable and boot your Pi
- Log in using PuTTY. The Host Name is
raspberrypi.localand the Port is 22. The login ispiand the password israspberry. - Type
sudo nano /etc/wpa_supplicant/wpa_supplicant.confand edit the file as described above.
Test SSH Access
Windows
Make sure that the computer is connected to the same WiFi router that the RPi2 is using. Download PuTTY here. Hostname is pi@raspberrypi.local and default password for the user pi is raspberry. The port should be set to 22 (by default), and the connection type should be set to SSH. Click Open to initiate the SSH session.
Mac OS X / Linux
Make sure that the computer is connected to the same WiFi router that the RPi2 is using.
Open Terminal and enter this command:
ssh pi@raspberrypi.local
Default password for the user pi is raspberry
iOS
Make sure that the iOS device is connected to the same WiFi network that the RPi2 is using. Download Serverauditor or Prompt 2 (use this if you have a visual impairment). Hostname is pi@raspberrypi.local and the default password for the user pi is raspberry. The port should be set to 22 (by default), and the connection type should be set to SSH.
You probably also want to make your phone a hotspot and configure the WiFi connection (as above) to use the hotspot.
Android
Make sure that the Android device is connected to the same WiFi network that the RPi2 is using. Download an SSH client in the Google Play store. Hostname is pi@raspberrypi.local and the default password for the user pi is raspberry. The port should be set to 22 (by default), and the connection type should be set to SSH. You may need to ssh using the ip address instead; the app “Fing - Network Tools” will tell you what the address is if needed.
You probably also want to make your phone a hotspot and configure the WiFi connection (as above) to use the hotspot.
Note: If connecting to the RPi2 fails at this point, the easiest alternative is to temporarily connect RPi to your router with an Ethernet cable and SSH in, making sure both the computer and the RPi2 are connected to the same router.
Configure the Raspberry Pi
Verify your Raspbian Version
- In order to do this, you must have done Path 1 or Path 2 above so that you have an environment to interact with
- Go to the shell / Terminal prompt. If running the GUI, look at the Menu in the upper left and click the icon three to the right of it (looks like a computer)
- Type
lsb_release -a - If it says anything about Release 8 / Jessie, you have the correct version and can continue.
- If it says anything else, you need to go back to Download and Install Raspbian Jessie
Run raspi-config
Run
sudo raspi-config
Here you can expand filesystem to maximize memory, change user password and set timezone (in internationalization options). This will take effect on the next reboot, so go ahead and reboot if prompted, or run sudo reboot when you’re ready.
Confirm that your keyboard settings are correct. Click on Menu (upper left corner of the screen, with raspberry icon). Mouse down to Preferences, and over to Mouse and Keyboard Settings. Click on Mouse and Keyboard Settings, then click on the Keyboard tab. Click on Keyboard Layout and be sure your country and variant are correct. For the US, it should be United States and English (US).
Note on Time Zone
It is imperative that you set the correct time zone at this step of the configuration process. OpenAPS will look at the timestamp of your CGM data, and the local time on the pump, when making recommendations for basal changes. The system also uses local time on the pi; so times and time zone need to match, or you will run into issues later. If the time zone is incorrect, or you haven’t done this yet, run sudo dpkg-reconfigure tzdata from the prompt and choose your local zone.
Note on Date and Time in Event of Power Compromise
To check the time is correct, type date. If the date is still not correct, try:
sudo /etc/init.d/ntp stop then sudo ntpd -q -g then sudo /etc/init.d/ntp start (This may need to be done if the pi unexpectedly lost power)
Setting up an SSH key for Password-less Login [optional]
You can setup a public/private key identity, and configure your local computer and the Raspberry Pi to automatically use it. This will allow SSH access to the Pi without requiring a password. Some people find this feature very convenient.
Windows
If you don’t already have an SSH key, follow this guide from GitHub to create one.
Create a .ssh directory on the Pi: run mkdir .ssh
Log out by typing exit
and copy your public SSH key into your RPi2 by entering
ssh-copy-id pi@raspberrypi.local
Now you should be able to log in without a password. Try to SSH into the RPi2 again, this time without a password.
Mac and Linux
In this section some of the commands will be run on your local computer and some will be run on your pi. This will be identified in parenthesis after each command.
If you don’t already have an ssh key, then run ssh-keygen (on your local computer - keep hitting enter to accept all the defaults).
If you created a new key identity and accepted all of the defaults, then the name of the newly generated identity will be id_rsa. However, if you set a custom name for the new identity (e.g. id_mypi), then you will need to add it to your local ssh keyring, via ssh-add ~/.ssh/id_mypi (on your local computer).
Next create a .ssh directory on the Pi: ssh pi@raspberrypi.local (on your local computer), enter the password for the pi user on the Pi, and run mkdir .ssh (on your pi).
Next, add your new identity to the list of identities for which the Pi’s pi user grants access via ssh:
cat ~/.ssh/<id_name>.pub | ssh pi@raspberrypi.local 'cat >> .ssh/authorized_keys' (on your local computer)
Instead of appending it to the list of authorized keys, you may simply copy your public key to the Pi, overwriting its existing list of authorized keys: scp ~/.ssh/<id_name>.pub pi@raspberrypi.local:~/.ssh/authorized_keys (on your local computer)
Finally, ssh pi@raspberrypi.local (on your local computer) to make sure you can log in without a password.
Wifi reliability tweaks [optional]
Many people have reported power issues with the 8192cu wireless chip found in many wifi adapters when used with the Raspberry Pi. As a workaround, we can disable the power management features (which this chip doesn’t have anyway) as follows:
sudo bash -c 'echo "options 8192cu rtw_power_mgnt=0 rtw_enusbss=0" >> /etc/modprobe.d/8192cu.conf'
Watchdog [optional]
Now you can consider installing watchdog, which restarts the RPi2 if it becomes unresponsive.
Enable the built-in hardware watchdog chip on the Raspberry Pi:
Install the watchdog package, which controls the conditions under which the hardware watchdog restarts the Pi:
sudo apt-get install watchdog
sudo modprobe bcm2708_wdog - If this command does not work, it appears to be ok to skip it.
sudo bash -c 'echo "bcm2708_wdog" >> /etc/modules'
Note: On the RPi3, the kernel module is bcm2835_wdt and is loaded by default in Raspbian Jessie.
Edit the config file by opening up nano text editor
sudo nano /etc/watchdog.conf
Uncomment the following: (remove the # from the following lines, scroll down as needed to find them):
max-load-1              = 24
watchdog-device         = /dev/watchdog
Next, add watchdog to startup applications:
sudo update-rc.d watchdog defaults
Finally, start watchdog by entering:
sudo service watchdog start
Note: The init system which handles processes going forward in most Linux systems is systemd. Rc.d may be depreciated in the future, so it may be best to use systemd here. Unfortunately, the watchdog package in Raspbian Jessie(as of 12/10/2016) does not properly handle the systemd unit file. To fix it, do the following:
echo "WantedBy=multi-user.target" | sudo tee --append /lib/systemd/system/watchdog.service > /dev/null
this should place it in the service file under the [Install] heading.
and then to enable it to start at each boot:
sudo systemctl enable watchdog
To start process without rebooting:
sudo systemctl start watchdog
Update the Raspberry Pi [optional]
Update the RPi2.
sudo apt-get update && sudo apt-get -y upgrade
The packages will take some time to install.
Disable HDMI to conserve power [optional]
Via Raspberry Pi Zero - Conserve power and reduce draw to 80mA:
If you’re running a headless Raspberry Pi, there’s no need to power the display circuitry, and you can save a little power by running/usr/bin/tvservice -o(-pto re-enable).
To disable HDMI on boot, use sudo nano /etc/rc.local to edit the rc.local file. Add /usr/bin/tvservice -o to the file and save.
Configure Bluetooth Low Energy tethering [optional]
The Raspberry Pi can be tethered to a smartphone and share the phone’s internet connection. Bluetooth tethering needs to be enabled and configured on the phone device and your carrier/plan must allow tethering. The Raspberry Pi 3 has an inbuilt Bluetooth Low Energy (BLE) chip, while a BLE USB dongle can be used with the other Pi models.
The main advantages of using BLE tethering are that it consumes less power on the phone device than running a portable WiFi hotspot and it allows the Raspberry Pi to use whatever data connection is available on the phone at any given time - e.g. 3G/4G or WiFi. Some have also found that power consumption on the Raspberry Pi is lower when using BLE tethering compared to using a WiFi connection, although this may vary depending on BLE USB dongle, WiFi dongle, etc.
First, we clone a repository which contains scripts which are used later in the setup -
cd /home/pi
git clone https://github.com/WayneKeenan/RaspberryPi_BTPAN_AutoConnect.git
We then copy the required scripts into a ‘bin’ directory -
mkdir -p /home/pi/bin
cp /home/pi/RaspberryPi_BTPAN_AutoConnect/bt-pan /home/pi/bin
cp /home/pi/RaspberryPi_BTPAN_AutoConnect/check-and-connect-bt-pan.sh /home/pi/bin
To configure a connection from the command line -
sudo bluetoothctl
Enter the following commands to bring up the adapter and make it discoverable -
power on
discoverable on
agent on
default-agent
The adapter is now discoverable for three minutes. Search for bluetooth devices on your phone and initiate pairing. The process varies depending on the phone and the dongle in use. The phone may provide a random PIN and bluetoothctl may ask you to confirm it. Enter ‘yes’. Then click ‘pair’ on the phone. Instead, the phone may ask you to enter a PIN. If so, enter ‘0000’ and when bluetoothctl asks for a PIN, enter the same code again. Either way, bluetoothctl should inform you that pairing was successful. It will then ask you to authorize the connection - enter ‘yes’.
Execute the paired-devices command to list the paired devices -
paired-devices
Device AA:BB:CC:DD:EE:FF Nexus 6P
Your paired phone should be listed (in this example, a Google Nexus 6P). Copy the bluetooth address listed for it; we will need to provide this later.
Now trust the mobile device (notice that bluetoothctl features auto-complete, so you can type the first few characters of the device’s bluetooth address (which we copied previously) and hit
NOTE: Whenever you see ‘AA:BB:CC:DD:EE:FF’ or ‘AA_BB_CC_DD_EE_FF’ in this guide, replace it with the actual address of your mobile Bluetooth device, in the proper format (colons or underscores).
trust AA:BB:CC:DD:EE:FF
Quit bluetoothctl with ‘quit’.
Now, we create a service so that a connection is established at startup. Execute the following commands to create a net-bnep-client.service file and open it for editing in Nano -
cd /etc/systemd/system
sudo nano net-bnep-client.service
In the editor, populate the file with the text below, replacing AA:BB:CC:DD:EE:FF with the address noted earlier -
[Unit]
After=bluetooth.service
PartOf=bluetooth.service

[Service]
ExecStart=/home/pi/bin/bt-pan client AA:BB:CC:DD:EE:FF

[Install]
WantedBy=bluetooth.target
Save the file, then enable the service -
sudo systemctl enable net-bnep-client.service
Open your crontab for editing -
crontab -e
...and add an entry to check the connection every minute and reconnect if necessary -
* * * * * /home/pi/bin/check-and-connect-bt-pan.sh
Save the file, then restart -
sudo shutdown -r now
or
sudo systemctl reboot